Friday, December 23, 2011

Holiday Cookies!


I always try out new cookie recipes for Christmas and host a cookie swap. This year I was traveling right up until recently so the cookie swap did not take place. I did try out four new recipes for gift giving and to bring to holiday gatherings; A colorful pistachio cranberry cookie, a rich and buttery chocolate espresso that adds a little sparkle with vanilla sugar, a chewy amaretti cookie sandwich with raspberry jam and chocolate ganache filling, and an orange cardamom with orange vanilla icing that melts in your mouth! All are equally decadent in their own way. Make one or all any time during the year!


Cranberry Pistachio 
Source: Gourmet 2006


I found this recipe while searching online for Christmas cookies a few years back. I love the color and they are very easy to make. Leave the dough in the fridge and cut and bake as needed.

1 1/2 cups flour
1/2 teaspoon cinnamon
1/4 teaspoon salt
1 1/2 sticks (3/4 cup) unsalted butter, softened
1/4 cup plus 2 tablespoons granulated sugar
1/2 teaspoon finely grated fresh orange zest
1/2 cup shelled pistachios 
1/3 cup dried cranberries

Stir together flour, cinnamon, and salt in a bowl. Beat together butter, sugar, and zest in a separate bowl with electric mixer until pale and fluffy. Add flour mixture in small batches until dough comes together in clumps. Mix in pistachios and cranberries. Split the dough in half and form two logs (it helps to use plastic wrap). Form the tubes into a square shape and chill in refrigerator for at least 2 hours. When ready to bake, preheat oven to 350, cut 1/4" slices and arrange on parchment covered cookie sheet 1/2" apart. Bake until edges are pale golden brown, about 15 to 18 minutes. Remove from parchment and cool on racks. I doubled the recipe and ended up with about 4 dozen cookies.


Chocolate Espresso Sparklers


This is a Martha Stewart original. I really like the cocoa and espresso combination with pretty vanilla sugar decorating the outside. This is also another easy recipe where you can cut and bake as needed. 

1 1/2 cups all purpose flour
3/4 cups unsweetened Dutch-process cocoa powder (I used Valrhona cocoa powder sold at Whole Foods)
1/4 teaspoon salt
1/4 teaspoon finely ground black pepper
1 tablespoon plus 1 teaspoon good-quality instant espresso powder
1/2 teaspoon ground cinnamon
3/4 cup unsalted butter, softened
1 cup granulated sugar
1 large egg
1 1/2 pure vanilla extract
Gold course sanding sugar (I used vanilla sugar)

Sift together flour, cocoa powder, salt, pepper, espresso powder, and cinnamon in large bowl. Set aside. Mix butter and sugar together in a separate bowl until pale and fluffy. Mix in flour mixture until just combined. Roll out dough on parchment, and roll into a 2 inch log. Roll log and square off. Chill for at least one hour. When ready to bake, preheat oven to 350, remove dough from fridge and let sit for a few minutes to soften. Roll the dough in the vanilla sugar to coat. Next, cut into 1/4" slices and bake for 10 minutes. The cookies are done when there is slight resistance when touched with fingertip.

Chewy Amaretti Sandwich Cookies


I knew that I wanted to make an almond cookie after my recent trip to Switzerland where I had a delicious chewy marzipan cookie with chocolate covered bottom. I performed a quick search, and found that one of my favorite blogs of all time, Smitten Kitchen had exactly what I was looking for! The cookies came out perfect and the recipe is very easy. No flour and I enjoy using a pastry bag when creating these! I decided to use raspberry jam AND chocolate ganache for the sandwiches. Both are equally incredible with the chewy almond.

1 7-ounce tube pure almond paste
1 cup sugar
pinch of salt
2 large egg whites, room temp for at least 30 minutes

Preheat oven to 300. Place parchment paper on cookie sheet. The recipe says to pulse the almond paste and sugar until broken up. Since I do not have a food processor, I used a Pastry Blender which worked fine. Add the egg whites and puree until smooth with the food processor or beat with electric mixer like I did. Next, fill pastry bag with mixture and pipe 3/4" rounds onto the parchment paper with a 3/4" tip or no tip like I did. Be sure to space the cookies 1" apart. Bake for 15-18 minutes (mine took 16 minutes) or until pale golden on the edges. Turn the cookie sheet at halfway point at around 7 minutes. Let cool completely and remove from parchment. To make the ganache, melt 3 oz. semi-sweet chocolate with 1-2 tablespoons cream. 

Orange Cardamom Cookies with Orange Vanilla Glaze


This recipe was adapted from Epicurious.com. In a world of electronic recipe keeping, I am known to have many recipes decorating my fridge at a given time! This recipe has been on my fridge for quite a while, and I am happy to finally make it! I love cardamom and the combination with orange makes this my favorite of all cookies listed in this post. 

2 1/2 cups flour
1 1/2 tablespoons grated orange zest
1 1/2 teaspoons ground cardamom
1 teaspoon salt
2 sticks unsalted butter, softened
3/4 cup sugar
1 large egg yolk
2 Tablespoons heavy cream

Whisk together flour, zest, cardamom, and salt. Set aside. Beat butter and sugar with electric mixer until pale and fluffy, then beat in yolk and cream. At low speed, mix in flour mixture in three batches just until dough forms. Quarter dough and form each piece into a disc. Chill, wrapped in plastic wrap until firm for at least 2-3hrs. When ready to bake, preheat oven to 350. Roll out dough between two pieces of parchment paper and cut out cookies using a 3" round cookie cutter or a cutter of your choice. When dough starts to soften, chill quickly in freezer and continue making cookies. Bake for 12 minutes or until pale golden on edges. To make orange vanilla glaze, mix 1 1/2 cups powdered sugar with 2 tablespoons milk with 1/8 teaspoon vanilla extract and approximately 1/4 teaspoon orange zest. Be sure that cookies are completely cool before drizzling with glaze. 


Enjoy and Happy Holidays!


Wednesday, November 30, 2011

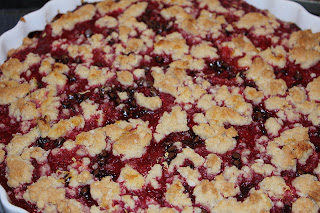
Raspberry Chocolate Crumb Squares


The raspberry square is a classic dessert. Most recipes call for jam or a combination of jam and fresh raspberries. I like a little tartness provided by using only fresh. By adding cornstarch, the raspberries form a jam-like consistency. A little lemon juice with a controlled amount of sugar allows you to adjust the the level of tartness. I just so happened to have some mini chocolate chips on hand and added some to the filling. Naturally! With lemon zest and an almond crust, this is an extremely delicious and very festive dessert that will not last very long at any gathering!  I topped off the dessert with powdered sugar and some lemon vanilla icing.  If you are in a chocolate mood, chocolate sauce is great (there could never be enough chocolate!), but I really enjoyed the lemon vanilla icing with powdered sugar. It was like a streusel!  Like most of my recipes, you can veganize this one and replace the butter with Earth Balance and use an egg substitute. I would recommend trying out some different berries such as cherries, blackberries or blueberries. Whatever happens to be season or available. This is an easy recipe with many possibilities.

Ingredients
1 1/2 cups flour
2 cups fresh raspberries
1/2 cup sugar
1/2 teaspoon baking powder
1/4 cup mini chocolate chips
1 stick butter
1 Tablespoon cinnamon
1/2 cup slivered almonds, ground
1/2 tablespoon cornstarch
dash of salt
1 egg
1/2 teaspoon vanilla extract
1/4 cup brown sugar
1/2 teaspoon Lemon zest


Icing
1.5 cups powdered sugar
2 tablespoons soy milk
1 teaspoon vanilla
1.5 teaspoons fresh lemon juice

Preheat oven to 375. Grease a tart pan or 9X9 baking dish. Combine flour, 1/4 cup sugar, baking powder, and salt. Cut in butter until it is a course crumble. Stir in the egg, extract, and almonds. Spread 2/3 of the mixture into prepared tart pan. Reserve 1/3 of the mixture for the topping. In a separate bowl, combine the raspberries with 1/4 cup of sugar and cornstarch. Mash gently with a fork. Spread evenly over the crust. Sprinkle mini chocolate chips over raspberry mixture followed by lemon zest, and remaining topping.

Bake for 40 minutes or until the topping is golden brown. Let cool for at least 15 minutes (if you can wait that long!). Sprinkle with powdered sugar. Mix ingredients for vanilla icing. Add more or less milk for desired consistency. Drizzle icing over raspberry squares. 

This crust is perfect!


Delicious!


Now that we talking festive, delicious and jam-like... be sure to check out Boston local band, Walter Sickert and the Army of Broken Toys ! Listen to their new album, SteamShipKillers on the website.  They are a must see live! 


Enjoy!

Saturday, November 26, 2011

Kickin Beef Soup

This is the season for soup. Whether you are sick and in need of an elixir, or just want something warm. This will do the trick. The srircha adds a nice kick in combination with the full flavor of the seasoned beef.  You'll also get a nice dose of protein, vitamins and minerals from the brussels sprouts, fennel, red peppers and tomato. Fennel is packed with Niacin, Calcium, Iron, Magnesium, Phosphorus and Copper, and a very good source of Dietary Fiber, Vitamin C, Folate, Potassium and Manganese. Read up on FennelYou can replace the beef with tofu and use vegetable stock for a vegeterian/vegan soup. It is simply delicious, low in calories, nutritious and very comforting!!


Ingredients

1lb stew chunk beef
1 fennel, chopped
1 lb. Brussels sprouts cut in half
2 red peppers chopped
1 tablespoon cardamon
1.5 tsp cinnamon
2 tablespoons paprika
1 tablespoon garlic salt
1 tsp. pepper
1 tablespoon cumin
~2 tablespoons sriracha chili sauce
~1 tablespoon worcestershire sauce
 2 tomatoes, chopped
 1 8oz. can crushed tomato

Add 2 tablespoons of oil to a large pot. Add beef. Season with cardamon, cinnamon, paprka, garlic salt, cumin. Cook until seared. Turn heat down to low. Cook Brussels sprouts, red peppers and fennel in separate pan. Add worcestershire sauce, sriracha and season with salt and pepper. Cook for about 20min. Add to beef pot. Add tomatoes, followed by enough water to cover everything in pot. Bring to boil and reduce heat to a simmer. The longer it simmers the better (at least for a couple of hrs.). I recommend using a slow cooker.

Lots of flavor!


This alone would make a great dish!


I attended the Boston Music Awards at The Liberty Hotel (formerly the Charles Street Jail) on November 20th. Among the winners were Freezepop - Best Electronic Act, Viva Viva - Rock Artist of the Year, Lady Lamb the Beekeeper - Singer Songwriter of the Year, Shea Rose - R&B/Soul/Urban Contemporary Artist of the Year, Dead Cats Dead Rats - Punk Artist of the Year, The Dropkick Murphys  took home two awards, Live Artist of The Year & Artist of the Year. There were so many great live performances. All were winners! Among them were Bodega GirlsThe WandasEmperor Norton's Stationary Marching Band who performed outside the hotel!  Check out a recap and full list of winners and nominees on Boston Music Spotlight and on the BMA Facebook page.

Enjoy!

Tuesday, November 15, 2011

Crepe Making with Dore Creperie!


This past Saturday I had the pleasure of learning the fine art of crepe making at Dore Creperie. Vilas Dhar conducts classes at this "pop-up" restaurant as another way of bringing more buzz to the location in downtown Boston. Read more about about Vilas and his Dore Creperie Pop-Up on Boston.com.
Crepe making demonstration with Vilas and Rob

There were eight of us in the class. We sat and listened to a brief presentation about the history of the crepe. Then we were split up into pairs and given tasks. We made crepe batter which consisted of eggs, melted butter, flour and sugar for the sweet crepe, and the savory batter had some herbs; Rosemary, thyme, oregano and a couple of others that I am forgetting. We then learned how to make crepes on the crepe stone! It is definitely more difficult than it looks! Vilas calls the wooden tool used to spread the batter around the stone 'a dowel'. It seems that the interwebs calls it a 'Trowel Spreader'. This small tool evenly distributes the thin batter allowing for a nice, crispy crepe. A very important tool, indeed! We then chose our fillings. For me, I chose a sweet variety with bananas, brown sugar, walnuts and marshmallows with a little whipped creme and cinnamon on top. We all had fun sampling each of our creations! There was so much going on in the kitchen, and with customers sporadically coming in during the class. Vilas remained calm, cool and collected and kept the class fun and engaging. At Dore they are always experimenting with different recipes. Vilas earlier that day cooked up some caramelized oinions and made a focaccia dough. He did not have time to finish and make the bread, so my food blogger buddy, Rachel who invited me to the event, volunteered me to finish the bread! I gladly agreed and made a few loaves of focaccia! It was my first time making focaccia, so it was risky. Luckily it came out pretty good and everyone enjoyed eating it. I would've made some cookies, but they were out of vanilla and sugar. This was the first I was let loose in an industrial kitchen and I would have whipped up many more baked goods that evening! With some good music, great company and the right tools, the atmosphere was perfect for cooking!

An added bonus, foccacia!

Dore will be closing its doors on November 19th. I highly recommend stopping in if you can and trying the bananas foster or the elvis crepes. The elvis contains bananas, peanut butter, and bacon! Vilas cooks the bacon on the crepe stone first and then adds the remaining ingredients. The flavors meld together perfectly. 


It is sad that Dore will be closing, but Vilas and partners are planning another pop-up in the near future. Keep a look out for the next pop-up restaurant near you!

In addition to having great pop-up restaurants, Boston also has a thriving local music scene. I would like to feature a new band with each blog post whenever possible. This evening of crepe making reminds me of a local band called The Cinnamon Fuzz I once had the privilege of sharing the stage with at Church of Boston about a year ago when playing with The Michael J. Epstein Memorial Library. Check out their techy, new-wave synth pop EP, Cruise of The Century with songs like Reboot My Heart! Let's see if you recognize the special guest with red hair appearing at the end of the You Tube video!


Wednesday, November 2, 2011

Pumpkin Peanut Butter and Liver Dog Treats with a Dog Halloween Parade Recap


 I was inspired to make some treats for my dog, Pluto after seeing the annual dog Halloween costume parade at Tomkins Square Park while visiting New York. It was a beautiful fall day with many adorable dogs and creative costumes! My favorite was Borat. Here is a link to my photo album with pictures from the event: Parade pictures The dogs seemed so proud and happy to show off their costumes! They were definitely trained to wear the costumes with some very yummy treats. Evermore Pet Food had a booth set up with some samples for the dogs. The samples looked like Pâté. I decided to make some Liver Treats when I returned back to Boston. I also found a Pumpkin Peanut Butter biscuit recipe. Pluto loved both. The liver treats were difficult to stomach while preparing. I will spare you from seeing pictures of ground up raw meat being spread onto a baking dish. Not very appetizing for sure! This was my first time cooking liver. The recipe requires that you blend the liver. It looked like a liver milkshake. Again, I will spare you... unless you really need to see the pics for the recipe. I will provide them upon request. The smell while cooking is pretty distinctive and not pleasant. Windows were opened even though it was cold outside! Pluto was loving it. Dogs will go crazy for these treats. They are great for training if you can handle the prep! The pumpkin peanut butter biscuits are great for a fall themed gift. Play around with the recipes and add different ingredients. Dog treats are very easy to make. Both recipes will make enough to last for a while. I may never purchase dog biscuits again and have fun while creating my own!

Borat stole the show!


Wednesday, October 26, 2011

Asian Pear Roasted Vegetable Fettuccine with Asiago Cheese Sauce


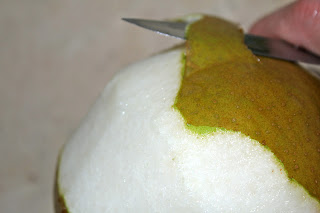
I was recently introduced to the Asian Pear in Cranbury, NJ at Lee Orchard Garden where you can pick your own pears! This is the type of place that is not easy to find unless you know of someone who has been before. There is a little sign out in front of an ordinary looking house leading to the farm. The sign is easy to miss if you are not looking for it.  There is certainly nothing ordinary about this place. Bob Lee and his wife grow Asian pears, grapes, apples and some vegetables that I have never heard of nor can I remember the name! They work hard and keep the farm immaculate. A true labor of love! I was fortunate to meet them and their very cute dogs.

The Asian Pear tastes great as is, but can also be used in a variety of recipes. I started asking around for good recipes and a friend told me about this pasta dish she had in Northern California. I altered it slightly by substituting brussels sprouts for roasted parsnips and asparagus. I love brussels sprouts, but the market did not have any that looked good. The roasted parsnips and asparagus worked out well in the end. The pear was so fresh that it somehow made the asiago cheese sauce seem healthy! You could try adding roasted butternut squash, fish, chicken... this is a great dish. I think the Asian pear is now my favorite fruit!


Ingredients

1Asian Pear, thinly sliced
1bunch asparagus
2-3parsnips
snow peas
1 cup asiago cheese, shredded
1 cup light cream
3 tablespoons butter
pepper
fettuccine


Directions

Preheat oven to 350F. Cut asparagus and parsnips into bite sized pieces and add to baking dish with about 3 tablespoons olive oil. Roast (~30 min). Saute snow peas in 1 tablespoon of oil. Set aside. Heat cream on medium. Add butter. Once the butter is melted add in flour one tablespoon at a time. Next, slowly add in cheese. Sauce will thicken. Season with pepper. Cook fettuccine, drain and add to cheese sauce followed by roasted vegetables, snow peas and pear slices. Serve!


Enjoy!

Monday, October 24, 2011

Squash Candy

I took a giant leap outside of my candy making comfort zone and set out to make squash caramels with the candied spaghetti squash I had leftover from making the Candied Spaghetti Squash Custard Tart. I knew that caramels could be tricky. The process was fun. I ended up with a squash sugar candy with lots of flavor and a nice burnt sugar squash chocolate covered brittle, but no caramels. I found this Ginger Cinnamon Caramel recipe after the fact and realized that I did not add enough butter and cream into my mixture. Plus, I may have taken it off the heat a little early. I think this calls for a consultation with my friend and caramel expert, Kai over at Nosh This to know for sure... what a good excuse to plan for another trip out to San Francisco!
In the end, my squash candies were tasty. I was really impressed when one of my scientist friends could taste a hint of the ginger in the softer, lighter pieces. I still plan on making another attempt at conquering the caramel at a later date! 

Ingredients
 ~2Cups candied squash mixture 
(refer to "Candying The Squash" in Candied Spaghetti Squash Custard Tart)
Candy Thermometer
Blender 
Parchment Paper
Chocolate (I used Ghirardelli 60%)
1 Tablespoon butter
1/4 Cup heavy cream
Candy wrappers (optional)

Instructions
Butter a glass baking dish (I used 11x7). Heat the candied squash mixture in a medium saucepan on medium high until warm and easy to pour. Blend using a hand blender or if you are like me and do not have a hand blender, use a countertop blender and blend until smooth and squash pieces are no longer visible. Return to saucepan on medium high heat. Add butter and heavy cream. Bring the temperature to soft ball using candy thermometer. Remove from heat, pour into glass baking dish, smooth and cut into pieces. Now, this is where you should have nice, chewy caramels. For me, the candy was sugary and soft, but not chewy. It was more like a maple sugar candy. Curious to see what would happen, I decided to return some of the candy to the saucepan and heat a little more. The candy darkened and ended up as a burnt sugar brittle. I cut the brittle when it was cool enough (yet still soft) with a strong pair of kitchen sheers. This really helped to create nice little squares. I had some Ghirardelli chocolate close by (I always have chocolate close by), so I melted a bar and dipped the squares. I then put the chocolate dipped squares in the freezer until set and wrapped in candy wrappers to be extra fancy.


The candy almost started to look like caramel when it came in contact with the buttered dish. 


Enjoy!

Nomsense is on Facebook!